How to Paint a Door Canopy: Step-by-Step Guide for Every Material
Every door canopy will eventually start to show signs of weathering. Sunlight, rain, and general wear can fade colours and make even the best-made canopy look tired over time.
A freshly painted door canopy can completely transform the look of your home. Whether you’re giving a tired, weathered canopy a new lease of life or adding a splash of colour to a brand-new one, painting is one of the easiest ways to improve your property’s kerb appeal. But there’s a catch, the right painting process depends heavily on the canopy’s material.
Timber, GRP/composite, and metal door canopies all require different preparation, products, and techniques to get the best finish. In this guide, we’ll walk you through everything you need to know, from choosing the right paint, to achieving a professional finish so you can paint your canopy confidently, no matter what it’s made from.
Composite & GRP Door Canopies

Unlike timber or metal door canopies, composite door canopies don’t need painting or sealing to protect them from the elements. However, they can be painted if you want to change the colour to match your windows or add a new lease of life to your home. Composite door canopies are one of the easiest to paint. They’re durable, low-maintenance and, if prepared properly, hold paint beautifully for years. In fact, we’ve had test samples painted with just one coat of Dulux Weathershield Exterior Paint sitting in direct sunlight for over six years and they still look as good as new.
What You’ll Need:
Exterior paint (e.g. Dulux Weathershield)
Isopropyl alcohol (IPA) for cleaning (Buy from - Amazon, Screwfix, B&Q)
Clean lint-free cloths (Buy from - Toolstation, Amazon, Screwfix)
Paint brush (recommended), roller or spray gun
Suitable thinner (if spraying)
Tack cloths (Buy from - Toolstation, ThePaintHub, Amazon)
Step-by-Step: How to Paint a Composite or GRP Door Canopy
1. Clean the canopy thoroughly
Wipe the entire surface with isopropyl alcohol to remove dirt, grease, and contaminants. A clean surface is key to proper paint adhesion. Once clean and dry, wipe the canopy with tack cloths to remove excess dust - Only do this immediately before you paint the canopy. (If you don’t want to buy tack cloths, a damp cloth is almost as effective.)
2. Choose your painting method
For most homeowners, brush painting is the best option. It’s simple and leaves subtle brush marks that mimic the look of natural wood grain. It’s so realistic it’s almost impossible to tell the difference. If you’d rather have a completely smooth finish, you can roll or spray the paint instead.
3. Apply the paint
Two coats of paint are usually enough (unless spraying where 3-4 will be needed). Always check the manufacturer’s recommendations for drying times and recoat intervals. If spraying, use the correct thinner recommended for your paint to prevent clogging and ensure even coverage.
4. Let it cure
Once finished, allow the paint to cure fully (typically 24-48 hours) before exposing the canopy to rain or heavy use.
Summary - Composite Canopies:
Painting composite canopies is straightforward and low-effort. The key is a spotless surface and high-quality exterior paint. Done correctly, your canopy will stay vibrant and protected for years.
Timber Door Canopies
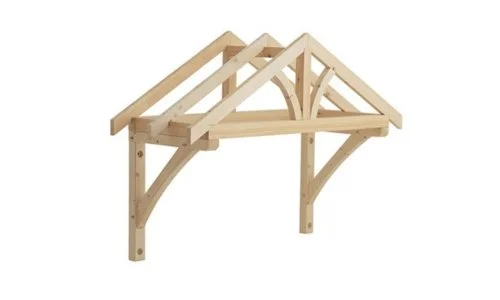
Timber canopies may seem easy to paint, but they actually require the most preparation. Wood needs careful cleaning, sanding, priming, and painting to achieve a durable, weather-resistant finish.
What You’ll Need:
Mild detergent and water
Sandpaper (120-150 grit for prep (Buy from - Toolstation, Amazon), 320-400 grit for finishing (Buy from - Screwfix, Amazon))
Wood filler (if you have any unwanted holes or cracks) (Buy from Screwfix, Toolstation, Amazon)
Fungicidal wash (If you canopy is starting to grow mould, lichen, or fungi) (Buy from - Sealants and Tools Direct, Amazon, Dulux)
Tack cloths (Buy from - Toolstation, ThePaintHub, Amazon)
Wood primer (e.g. Dulux Weathershield Primer)
Exterior wood paint (e.g. Dulux Weathershield)
Step-by-Step: How to Paint a Timber Door Canopy
1. Clean the surface
Wash the canopy with a mild detergent solution to remove dirt and grease, then let it dry completely.
2. Sand the wood
Use 120-150 grit sandpaper and sand with the grain to smooth out imperfections and help the paint adhere. If repainting an existing canopy that is already painted, sand until the old paint loses its gloss.
3. Fill any holes or cracks (if you want a perfect finish)
If you want a perfect finish, apply a wood filler like Everbuild Multi-Purpose and sand it smooth once dry. This ensures a flawless finish. However, a lot of people want the natural imperfections that come with wood, if that’s you, feel free to skip this step.
4. Treat for mould or algae
If you notice mould, lichen, or fungi, treat it with a fungicidal wash before painting. A badly affected canopy should be inspected for structural integrity. If it’s unstable, replace it rather than repaint - You would be responsible for any damage or injury caused by the canopy collapsing.
5. Remove all dust
Use tack cloths (preferred) or a damp cloth to wipe away sanding dust before priming.
6. Prime the wood
Wait for dry, mild weather (above 10°C). Apply a thin layer of wood primer suitable for your paint. This is essential for long-lasting results. Some people lightly sand the primer once dry for an ultra-smooth surface but some believe its unnecessary - if you do, clean away dust again before painting.
7. Apply the paint
Ensure the weather is a still dry and mild (above 10°C). Apply your first coat of paint, then let it dry fully (around 6 hours with Dulux Weathershield). Lightly sand with 320-400 grit sandpaper, clean away dust, and apply the next coat. Repeat until you’re happy with the coverage (2-3 coats + more if spraying) - but don’t sand the final coat.
8. Optional: Clear coat
Some paints require a clear protective coat. Dulux Weathershield doesn’t, but always follow your paint manufacturer’s advice.
Summary - Timber Canopies:
Timber door canopies take time and care to paint properly, but the result is a durable, weatherproof finish that enhances the natural beauty of the wood. Patience during prep pays off in the long run.
Aluminium & Steel Door Canopies
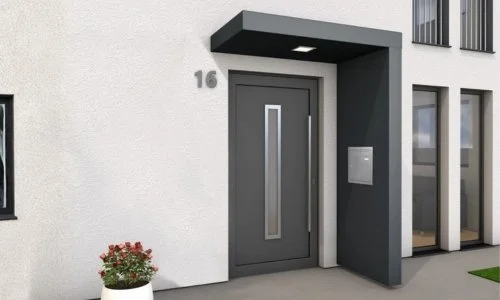
Metal door canopies are typically long-lasting and low-maintenance, but over time they can still suffer from scratches, chips, or faded paint. Before you start, it’s essential to know how your canopy was originally finished, because the painting process is different for each.
Most metal canopies fall into one of two categories:
Sprayed Canopies: Usually painted in the factory with a standard paint finish. These can be repaired more easily.
Powder-Coated Canopies: Finished with a baked-on, highly durable powder coating. These can usually only be touched up.
Below, we’ll cover how to approach each type.
1. Sprayed Aluminium or Steel Canopies
Sprayed metal canopies have a conventional painted finish, which makes them relatively easy to repair or touch up at home. This method is ideal if your canopy has a scratch, chip, or small damaged area.
What You’ll Need:
Isopropyl alcohol (IPA) for cleaning (Buy from - Amazon, Screwfix, B&Q)
Primer paint pen – suitable for metal
Colour-matched touch-up paint pen – matching your canopy colour (look at distributor to find the exact colour of your canopy. If you can’t find where your canopy is from, take a photo of it and image search until you find the right model)
Clear coat paint pen – for sealing and protecting
3000 grit sandpaper and a sanding block
Electric buffer or polisher (Buy from - Argos, Amazon, Screwfix)
Car wax – for final protection (Buy from - B&Q, Euro Car Parts, Amazon)
Step-by-Step: How to Touch Up a Sprayed Metal Door Canopy
1. Clean the Area
Wipe the scratched or damaged area thoroughly with isopropyl alcohol to remove any dirt, grease, or residue. A clean surface is essential for good adhesion.
2. Prime the Metal
If the scratch exposes bare metal, apply a thin layer of primer using a paint pen. This prevents rust and helps the paint bond properly.
3. Apply Touch-Up Paint
Following the manufacturer’s instructions carefully, use a colour-matched paint pen and apply three thin coats, letting each one dry completely before adding the next. The final coat should sit slightly higher than the surrounding paint surface, this makes it easier to sand flat later.
4. Wet Sand the Area
Once the paint is fully dry, wet the area and carefully sand with 3000 grit sandpaper and a sanding block. Work slowly and keep the sanding area small, only sanding until the new paint is flush with the original finish.
5. Apply a Clear Coat
Use a clear coat paint pen to seal the area and restore protection. Allow it to dry for at least 24 hours. Once dry, wet sand it again gently until level with the surrounding paint.
6. Polish and Buff
Apply a small amount of polishing compound and use a buffer to blend the repair into the original coating. Repeat 3–4 times if necessary for a seamless finish.
7. Finish with Wax
Apply a thin layer of wax to the area and buff it off. This adds a layer of protection and enhances the shine.
Tip: If you’re dealing with large-scale fading or multiple damaged areas, it’s often better to remove and respray the entire canopy for a consistent finish.
2. Powder-Coated Aluminium or Steel Door Canopies
Powder coating is a much tougher, baked-on finish that’s resistant to chipping, corrosion, and fading. The downside is that it’s very difficult to repaint at home. In most cases, your best option is to touch up small scratches or chips rather than attempting a full repaint.
What You’ll Need:
Isopropyl alcohol (IPA) for cleaning (Buy from - Amazon, Screwfix, B&Q)
Colour-matched powder coat touch-up paint – usually supplied by the manufacturer or specialist paint supplier
Step-by-Step: How to Touch Up a Powder-Coated Canopy
1. Clean the Area
Wipe the surface with isopropyl alcohol to remove any dirt, grease, or oxidation from the affected area.
2. Apply Touch-Up Paint
Using a colour-matched powder coat touch-up pen, carefully apply a light coat to the scratch or chip. Avoid over-applying, thin, even layers are key to blending it with the existing coating.
3. Let It Dry
Allow the touch-up paint to dry and cure as recommended by the manufacturer. This process can take longer than conventional paint, so avoid touching or cleaning the area until fully hardened.
Important: Powder coating is designed to be extremely durable, so if the finish is heavily damaged, peeling, or bubbling, a full professional re-paint or canopy replacement is usually the most effective solution.
Final Thoughts: Refresh Your Home with a New Look
Painting a door canopy is a brilliant way to breathe new life into your home’s exterior. Whether you’re working with wood, composite, or metal, the right preparation, products, and technique are key to a professional, long-lasting finish.
If you discover your canopy is too damaged or unstable during prep, it’s often safer, and more cost-effective, to replace it entirely. Explore our full range of composite door canopies designed for easy installation and painting to perfectly match your home.
FAQ: Painting a Door Canopy
How long will the paint last on a door canopy?
With proper prep and high-quality exterior paint, your canopy’s finish should last 5–10 years before needing a refresh.
Can I paint a canopy in winter?
It’s best to paint when temperatures are above 10°C and conditions are dry. Cold or damp weather can cause poor adhesion and peeling.
Do I need to use primer?
Yes, for wood and metal door canopies. Primer improves adhesion, protects against rust or rot, and extends the life of your paint. Composite canopies do not need primer.
Can I spray paint a canopy instead of brushing?
Yes, but for GRP canopies, brushing can create a natural wood-grain texture. If spraying, ensure you use the correct thinner and apply multiple thin coats.
What’s the easiest type of canopy to paint?
Composite/GRP canopies are usually the simplest — they require minimal prep and hold paint very well.
Ready to transform your entrance? Whether you’re giving an existing canopy a makeover or installing a brand-new one, a fresh coat of paint is one of the most effective ways to enhance your home’s kerb appeal.